Using Android Navigation Deeplink: An Easy Way to Use Deep Link in Navigation Component on a Big Project
I will demonstrate how to use deep link in Navigation Component on a big project and show some problems you might found during the implementation.
DesigningNavigation on Android is now easier than ever before with the Jetpack Navigation Component. This library allows you to implement navigation without the headache of complex navigation, which makes it easier to scale your navigation implementation in large projects.
Navigation Component Benefits 1. Automates fragment transactions, this can make our code cleaner. 2. Handles back stack 2. Simplified deep linking 3. Safe Args allows you to pass data between screens easily and type-safe 4. Handles transition animations 5. We can handle Drawer and Bottom Navigation easier 6. Centralizes and visualizes navigation In this article, I will show you my experience and some problems you might found when you use Jetpack Navigation Component in a big project.
Don't reuse fragments in many navigation graphs. In a big project, you can't avoid reusing a fragment in many Navigation graphs, but you might end up with this error:
Reuse fragments in many navigation graph error. The error happens when you try to release the project with pro-guards because SafeArgs Plugin will generate classes ****Args.kt and ***Directions.kt for all navigation graphs, but pro-guards won't allow you to have duplicate classes.
The solution, Nested Graph! When you need to use a fragment in many flows you can create a nested graph and reuse it anywhere.
Deep-link is the hero! You can't predict the future requirements of the business, but you can prepare for future change, deep-link in navigation component can make a complicated flow much simpler.
At the beginning of the project, you may have a significantly complicated flow, However, one day the requirements change, and now the app needs to use just a small flow from the significant flow. We could easily copy some part of the flow into the new flow, but we would have duplicate code.
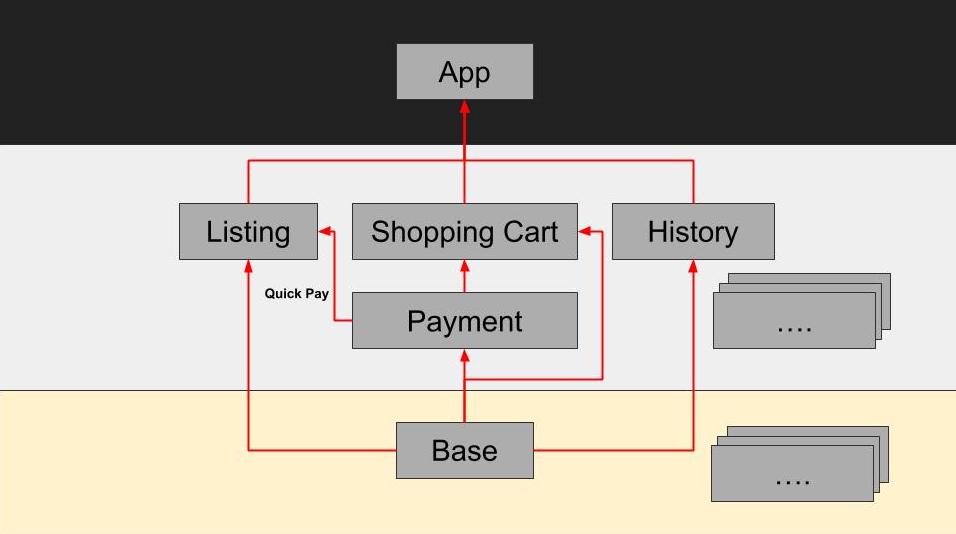
The solution is to make the flow smaller using the nested graph as I mentioned before and use the deep link for navigations. Global Action Global action is one way to access your navigation graphs from everywhere even from a nested graph just like a deep link, however they can't be accessed from another application.Creating deep links Here is a shopping cart project which has a product listing, shopping cart, payment, history, and more, and the project is also modularized by feature and uses Single Activity Architecture. I am assuming you already know how to set up and create basic navigation graphs. If you don't, you can learn by following Google's code lab.
Shopping Cart Project's ArchitectureWhen you create a navigation graph, I recommend creating one deep link for one flow where you can access the flow from anywhere in the project. Then, use the deep link for navigating between pages in your app, as you might need deep links in the future.
Deep-link handler We need a class that contains all the supported deep links and can be accessed anywhere in the project. We also can have custom functions as needed.
object InternalDeepLink {
    const val DOMAIN = "myapp://"

    const val LISTING = "${DOMAIN}listing"
    const val PAYMENT = "${DOMAIN}payment"
    const val SHOPPING_CART = "${DOMAIN}shopping-cart"
    const val HISTORY = "${DOMAIN}history"

    fun makeCustomDeepLink(id: String): String {
        return "${DOMAIN}customDeepLink?id=${id}"
    }
}
How to use the deep links Using the deep links is very easy. You can navigate to all screens that support deep links like this:
listingViewModel._navigateToShoppingCart.observe(viewLifecycleOwner, {
    val deepLink = InternalDeepLink.SHOPPING_CART.toUri()
    findNavController().navigate(deepLink)
})
We can use enums in the deep links Navigation library allows you to pass your custom enum class between destinations, you can view supported argument types.
For example, the listing page can search by car, watch, and both.
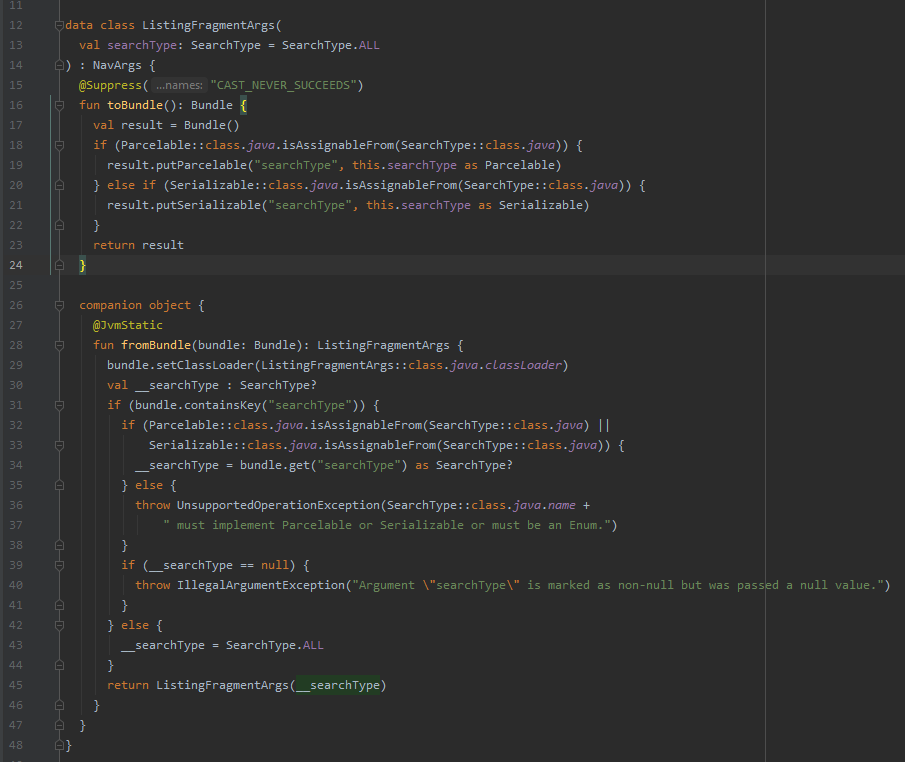
How to get the data from deep links. When we navigate to another page with some data SafeArgs Plugin will automatically handle the data. When you rebuild the project you will see ListingFragmentArgs.kt. This plugin also converts the data to your custom class if there is any. ListingFragmentArgs.ktYou can use navArgs() delegate for passing data like this:
class ListingFragment : Fragment() {
    ....
    private val args: ListingFragmentArgs by navArgs()

    override fun onCreate(savedInstanceState: Bundle?) {
        super.onCreate(savedInstanceState)
        Log.i("search type", args.searchType.name)
    }
    ....
}
Introduction to Deep Links
Deep links are a powerful tool in Android development that can significantly enhance the user experience within your app. Essentially, deep links are unique URLs that direct users to a specific location within the app, bypassing the need to navigate through multiple screens. When used in conjunction with the Navigation Component, deep links simplify in-app navigation, making it more intuitive and efficient for users. By implementing deep links, you can ensure that users can quickly access the content they need, improving overall engagement and satisfaction.
Setting Up the Navigation Component
To set up the Navigation Component in your project, you need to add the necessary library dependencies. Open your build.gradle file and include the following dependencies:
Next, you need to create a navigation graph, which serves as a centralized resource file containing all navigation-related information. To create a navigation graph, add a new resource file to your project and define the destinations and actions within it. This graph will help you manage and visualize the navigation flow in your app, making it easier to implement and maintain.
Creating and Handling Deep Link
Creating a deep link involves adding a deep link element to your navigation graph. This element specifies the destination that the deep link should navigate to. To add a deep link, click on the desired destination in the navigation graph and select “Add deep link” from the context menu. Define the URI for the deep link, ensuring it points to the correct destination.
Handling a deep link requires overriding the onNewIntent method in your activity. Within this method, call `handleDeepLink` on the Navigation Component to navigate to the specified destination:
By following these steps, you can create and handle deep links effectively, ensuring smooth navigation within your app.
Best Practices for the Navigation Component
When using the Navigation Component, consider the following best practices to optimize your implementation:
Use a Single Navigation Graph: Maintain a single navigation graph for your entire app to centralize navigation logic and simplify management.
Prefer Fragments Over Activities: Use fragments as destinations instead of activities to leverage the benefits of the Navigation Component.
Utilize NavController: Navigate between destinations using the NavController to ensure consistent and predictable navigation behavior.
Leverage NavigationUI: Use NavigationUI to handle navigation-related UI elements, such as the navigation drawer and bottom navigation.
Thoroughly Test Your Navigation Graph: Regularly test your navigation graph to ensure it functions as expected and provides a seamless user experience.
By adhering to these best practices, you can make the most of the Navigation Component and create a robust navigation system for your app.
Testing and Troubleshooting Deep Links
Testing deep links is crucial to ensure they work correctly. You can use the adb tool to simulate a deep link URL. For example, to test a deep link, run the following command: adb shell am start -n com.example.myapp/.MainActivity -d "http://example.com/deeplink" To troubleshoot deep links, utilize the Logcat tool to view navigation-related logs. This can help you identify and resolve any issues. Additionally, the Navigation Component debug tool allows you to visualize the navigation graph, making it easier to spot and fix problems.
How to open a deep-link WITHOUT backstack. 1. Open fragment A with deep-link (press back -> close app)
2. Open fragment B with deep-link (press back -> close app)
Mark
June 26th, 2021
Thanks for the content, could you please share the use-cases in the article in the project GitHub repo, thanks.
Filipe Bezerra
April 21st, 2022
Thanks for your examples, but you didn't show us how to pass that searchType argument using the deep link builder, so I'm asking now how I can do that?


1. Open fragment A with deep-link (press back -> close app)
2. Open fragment B with deep-link (press back -> close app)